
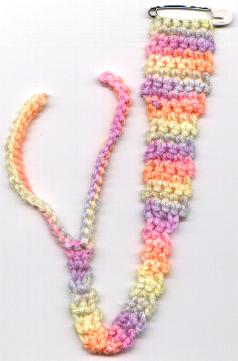
At my house we always called a pacifier a "pug" (it plugged up the noise). Here is one I created for my new grandson. I hope that you enjoy it and can put it to some use.
Note: This will be crocheted onto the closed side of the pin(the side that does not open).
Materials:
Row 1: Attach yarn to bar with a sl st and ch 1, do 6 sc across. Turn(6).
Rows 2 - 7: Ch 1, sc across to end. Turn(6).
Row 8: Ch 1, skip 1 sc, sc in next 3 sc, skip 1 sc, sc in last sc. Turn(4).
Row 9 - 18: Ch 1, sc across to end. Turn(4).
Row 19: ch 1, skip 1 sc, sc in next sc, skip 1 sc, sc in lat sc. Turn(2).
Row 20 - 42: Note: You can add or subtract rows from this section to make it longer or shorter).
Ch 1, sc across to end, turn(2).
The next row makes the ties to hold the pacifier.
Row 43: *ch 21, turn and work back along the chains just made. Skipping 1st ch, sc in each ch(20) back to row 42.* sc once in top of row 42. Repeat from * to * one more time and end with a sl st in last st on row 42. Fasten off and weave in ends.
You can use it the way it is or sew on some appliques to change the look.